Photoshop Actions and Coin Photography Editing
In coin image editing there are a lot of tasks that are repetitive, and thanks to Photoshop, they can be made into actions. If you’re only editing one image at a time, then you might think using actions seems like more work than they’re worth, but I think you’d be surprised. I’m often editing hundreds of coin images a day, doing many of the same standard things to every image, so actions are a necessity to maintain speed and consistency.
What are Photoshop actions?
An action is a series of tasks that you play back on a single file or a batch of files—menu commands, panel options, tool actions, and so on. For example, you can create an action that changes the size of an image, applies an effect to the image, and then saves the file in a desired format.
How can actions help me?
For my own coin image editing process, I've found there are more tasks that can be automated than tasks that need my own personal editing choices, so I’ve made custom action sets based on the kind of coin I'm photographing. There are a lot of advantages to using actions.
My list of coin imaging action sets is designed for raw coins, slabbed coins, coins in cases, etc. All these editing action groups are unique, though many have some of the same steps. Each process is tailored to be as automated as possible to produce the specific use and product.
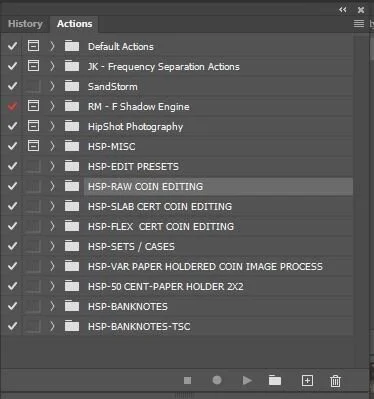
In the HSP-EDIT PRESETS group, I have actions to incrementally adjust contrast, saturation, levels, curves, and many of the other adjustments regularly used, providing me with a set of coin-specific adjustments to apply to any image.
In the HSP-MISC there are actions for focus stacking, zooms, drop shadows, and under shadows, as well as other useful tasks.
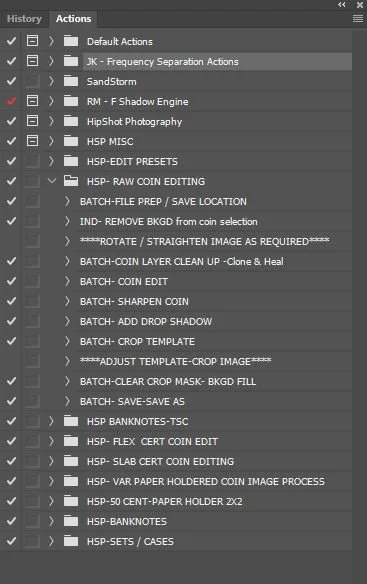
The image below is my RAW COIN EDITING action set opened. First, and foremost, the action set directs my workflow. My raw coin editing workflow consists of four general stages; Cut out, Clean, Edit, and Crop.
Let’s look at this action and see how it drives that workflow.
The eleven individual steps in the workflow above are built around what tasks require my input, and what don’t, and therefore, could be automated, so I don’t have to do anything other than the tasks I need to perform personally. They are a working check list, keeping me on an ordered, efficient, step by step, image editing process. A to Z. Front to back. Nothing is missed or forgotten.
Can I run an action for everything?
You could, but you won’t. Some things you must, or want to do yourself in photo editing, but for the things you don’t need to personally do, bring in the actions.
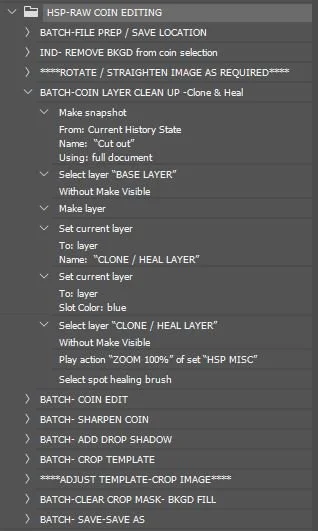
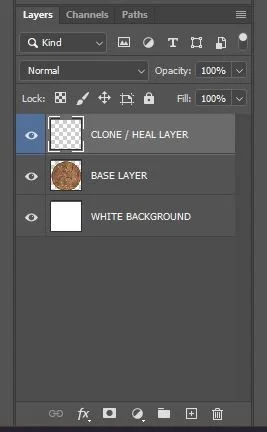
To give you an idea of what kinds of tasks I put in actions, the image below is the BATCH-CLONE LAYER CLEAN-UP action expanded. I often need to remove dust and dirt from coins that still don’t come off when I give them a jet of air. This action gets an image ready for non-destructive cleanup by automatically performing the tasks I would otherwise have to do to set up each image for dust and dirt removal. First, it makes a snapshot so I can revert back to the last finished state in my workflow, should I need to. Second, it selects the coin layer I need to work on. Third, it adds a new layer on top of it. This will be the layer I do the coin cleaning on. Fourth and fifth, it names the layer, based on its purpose, and adds a colour to it for organizational reasons. Finally, it zooms to 100% for the best clean-up view and even picks the spot-healing brush as the tool to start with. When the action finishes, which takes about a second, I can jump right on to cleaning the image.
The action does the mundane steps between each personal editing task that doesn’t require any personal brainpower, just extra time, and lets you concentrate on coin editing, not Photoshop. At this point in my workflow, the coin is cut out, and on a white background. Actions speed up my overall editing by replacing the tasks that I would do manually for each image, with a click of a button. I have several actions that have over 50 tasks.
On a related note, I set my panel options to Layer Bounds, under the Thumbnail Contents, to better see what is on each layer.
Looking back to the Actions list, you'll notice many of the actions start with the word BATCH-. In my workflow I usually open and edit 10 images at a time, so I batch-apply my actions to all 10 open images at once. They save me time. A lot of time. If the action starts with IND- I run it individually for each image
Finally, the best reason to use actions is they structure your workflow, giving you consistent image quality over hundreds of images. This is priceless. Of course, you will tailor your actions to your workflow, but this set is a good starting point for anyone.
For my workflow, the automated processing power the actions provide means I can fully marquee cut out and basic edit images, like the shot below, in less than 2 minutes.
Photoshop actions are incredibly valuable for photographers and designers alike. Additionally, they can be used to create unique effects that would otherwise require a great deal of manual effort. Ultimately, actions are an incredibly powerful tool for any photographer or designer who wants to make their work easier and more efficient. With a little practice, anyone can learn how to use actions in Photoshop and take advantage of their time-saving features.
Thanks for reading my blog. Follow me on Instagram at www.instagram.com/coin_photography_studio
These images were all photographed with my Dynamic Axial Lighting system.


